
|
|
|
Viking Age Arms and Armor
Viking Sword Hilt Inlays
|
Typically, the inlay found on excavated Viking-age hilts is only a pale shadow of its original brilliance. The rusting of the base metal underneath causes the precious metal overlay to lift away and flake off. Recent research has made more clear how the inlay was created on these historical hilts. By replicating these procedures, modern smiths can create reproductions (right) which give a sense of the spectacular beauty of the historical weapons when they were new. The series of schematic sketches below show how these inlays were created by Viking-age smiths. |
 |
 |
The smith started by cutting fine channels into the surface of the iron of the pommel. Each channel was created using two passes of the cutting tool, in order to create a W-shaped profile, seen in cross-section in the sketch to the left. The overhang allows the precious metal inlay to be better gripped by the iron of the pommel. |
 |
A piece of fine wire was fitted into each channel... |
 |
...and hammered into place, forcing the wire into the channel. In some historical pommels, the inlay has fallen out of the channel, revealing the central groove of the W-shaped channel. |
|
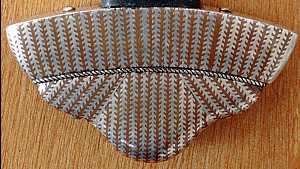
In order to create the striking herringbone pattern seen on the replica pommel above, a repeating pattern of different wire types was inlaid into the pommel. The first channel is inlaid with a wire made from silver and copper twisted in one direction, seen from above in the sketch to the right. The iron of the pommel is indicated by the black background. |
 |
|
The next channel has a silver wire inlay. |
 |
|
The next channel is silver and copper wire twisted together in the opposite direction. |
 |
|
And the next channel has a copper wire inlay. |
 |
|
The cycle is repeated again and again all over the surface of the pommel to create the herringbone pattern. |
 |
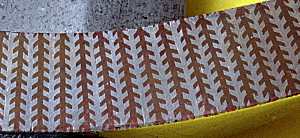
Excavated pommels often retain their inlay only in the cut channels, as seen on the historical pommel shown below. Underground, the iron rusts and bubbles under the precious metal, pushing the metal off the surface of the iron. Ultimately, the precious metal flakes away and is lost. Only the precious metal retained within the cut channels remains.
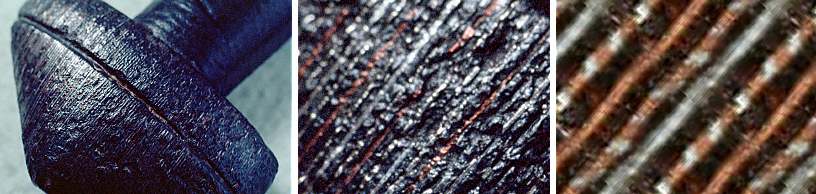
The photos above show the inlay in a historical pommel with increasing levels of magnification. In the middle image, the repeating cycle of four different wire types used to create the pattern is visible, with the base metal showing between each of the channels. At the highest level of magnification, on the right, the make-up of the four wires is clear: (from left to right) copper, then Z-twist silver/copper, then silver, then S-twist silver/copper.
|
The process requires exquisite control on the part of the smith. Fine, evenly spaced channels with a W-profile have to be cut in the iron. Fine wire with uniform twists must be created from precious metals. The wire must be perfectly hammered into place. Some historical pommels have as many as 20 channels per cm (about 50 per inch). The replica crossguard shown to the right is work in progress. Three of the four types of wire being inlaid are also visible. The pitch of the inlay on this replica is on the order of 20/cm, and the wire is 28 gauge (0.32mm diameter). |
 |
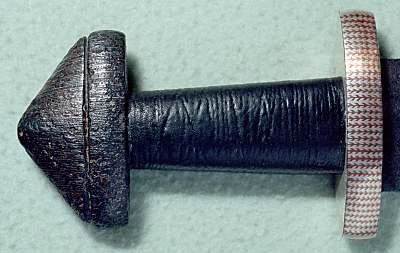 |
The finished crossguard is shown to the left, installed on a historical sword (below right). The sword had been ritually "killed" by folding in several places along the blade. One of the folds broke the tang, and at some point the original crossguard was lost. This replacement crossguard closely mimics the pattern seen in the pommel documented in the photos above. The historical sword was welded to make the tang whole once again, and the new crossguard installed. The new guard and old pommel show the dramatic contrast between the appearance of excavated historial weapons, and their likely appearance when new. The Hurstwic web article on Viking weapons then and now illustrates other such comparisons.
|
 |
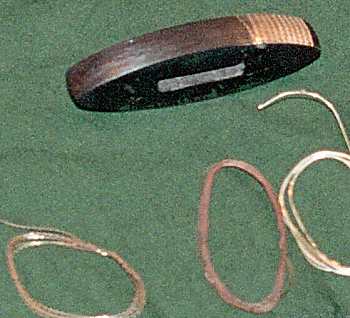
The modern replica crossguard shown to the left (part of a replica sword) uses a coarser pitch (about 15/cm), and 26 gauge (0.41mm diameter) wire was used for the inlay. Both this replica sword (below right), and the replacement crossguard shown above, were fabricated by Jeff Pringle, swordsmith.
|
|
|
©1999-2026 William R. Short |
